Why I Run a 2013 Mac Pro in 2025 (And Love It)
There’s a reality nobody talks about when you run a tech company. The more responsibilities you take on, the less time you have for the craft that got you there. Your days fill with product decisions, team coordination, client calls. Add a three-year-old daughter to the mix, and “free time” becomes a theoretical concept.
But I refuse to let my technical skills atrophy. So I carve out evening hours - after bedtime stories, after the apartment goes quiet - to experiment. To break things. To learn.
This post is the story of one of those experiments. A journey through hardware limitations I hadn’t expected, AI-assisted sysadmin workflows most people don’t know exist, and the quiet satisfaction of building infrastructure that belongs to me.
If you’re a technical person with too little time and too much curiosity, this is for you.
The Premise: A Beautiful Machine With a Complicated History

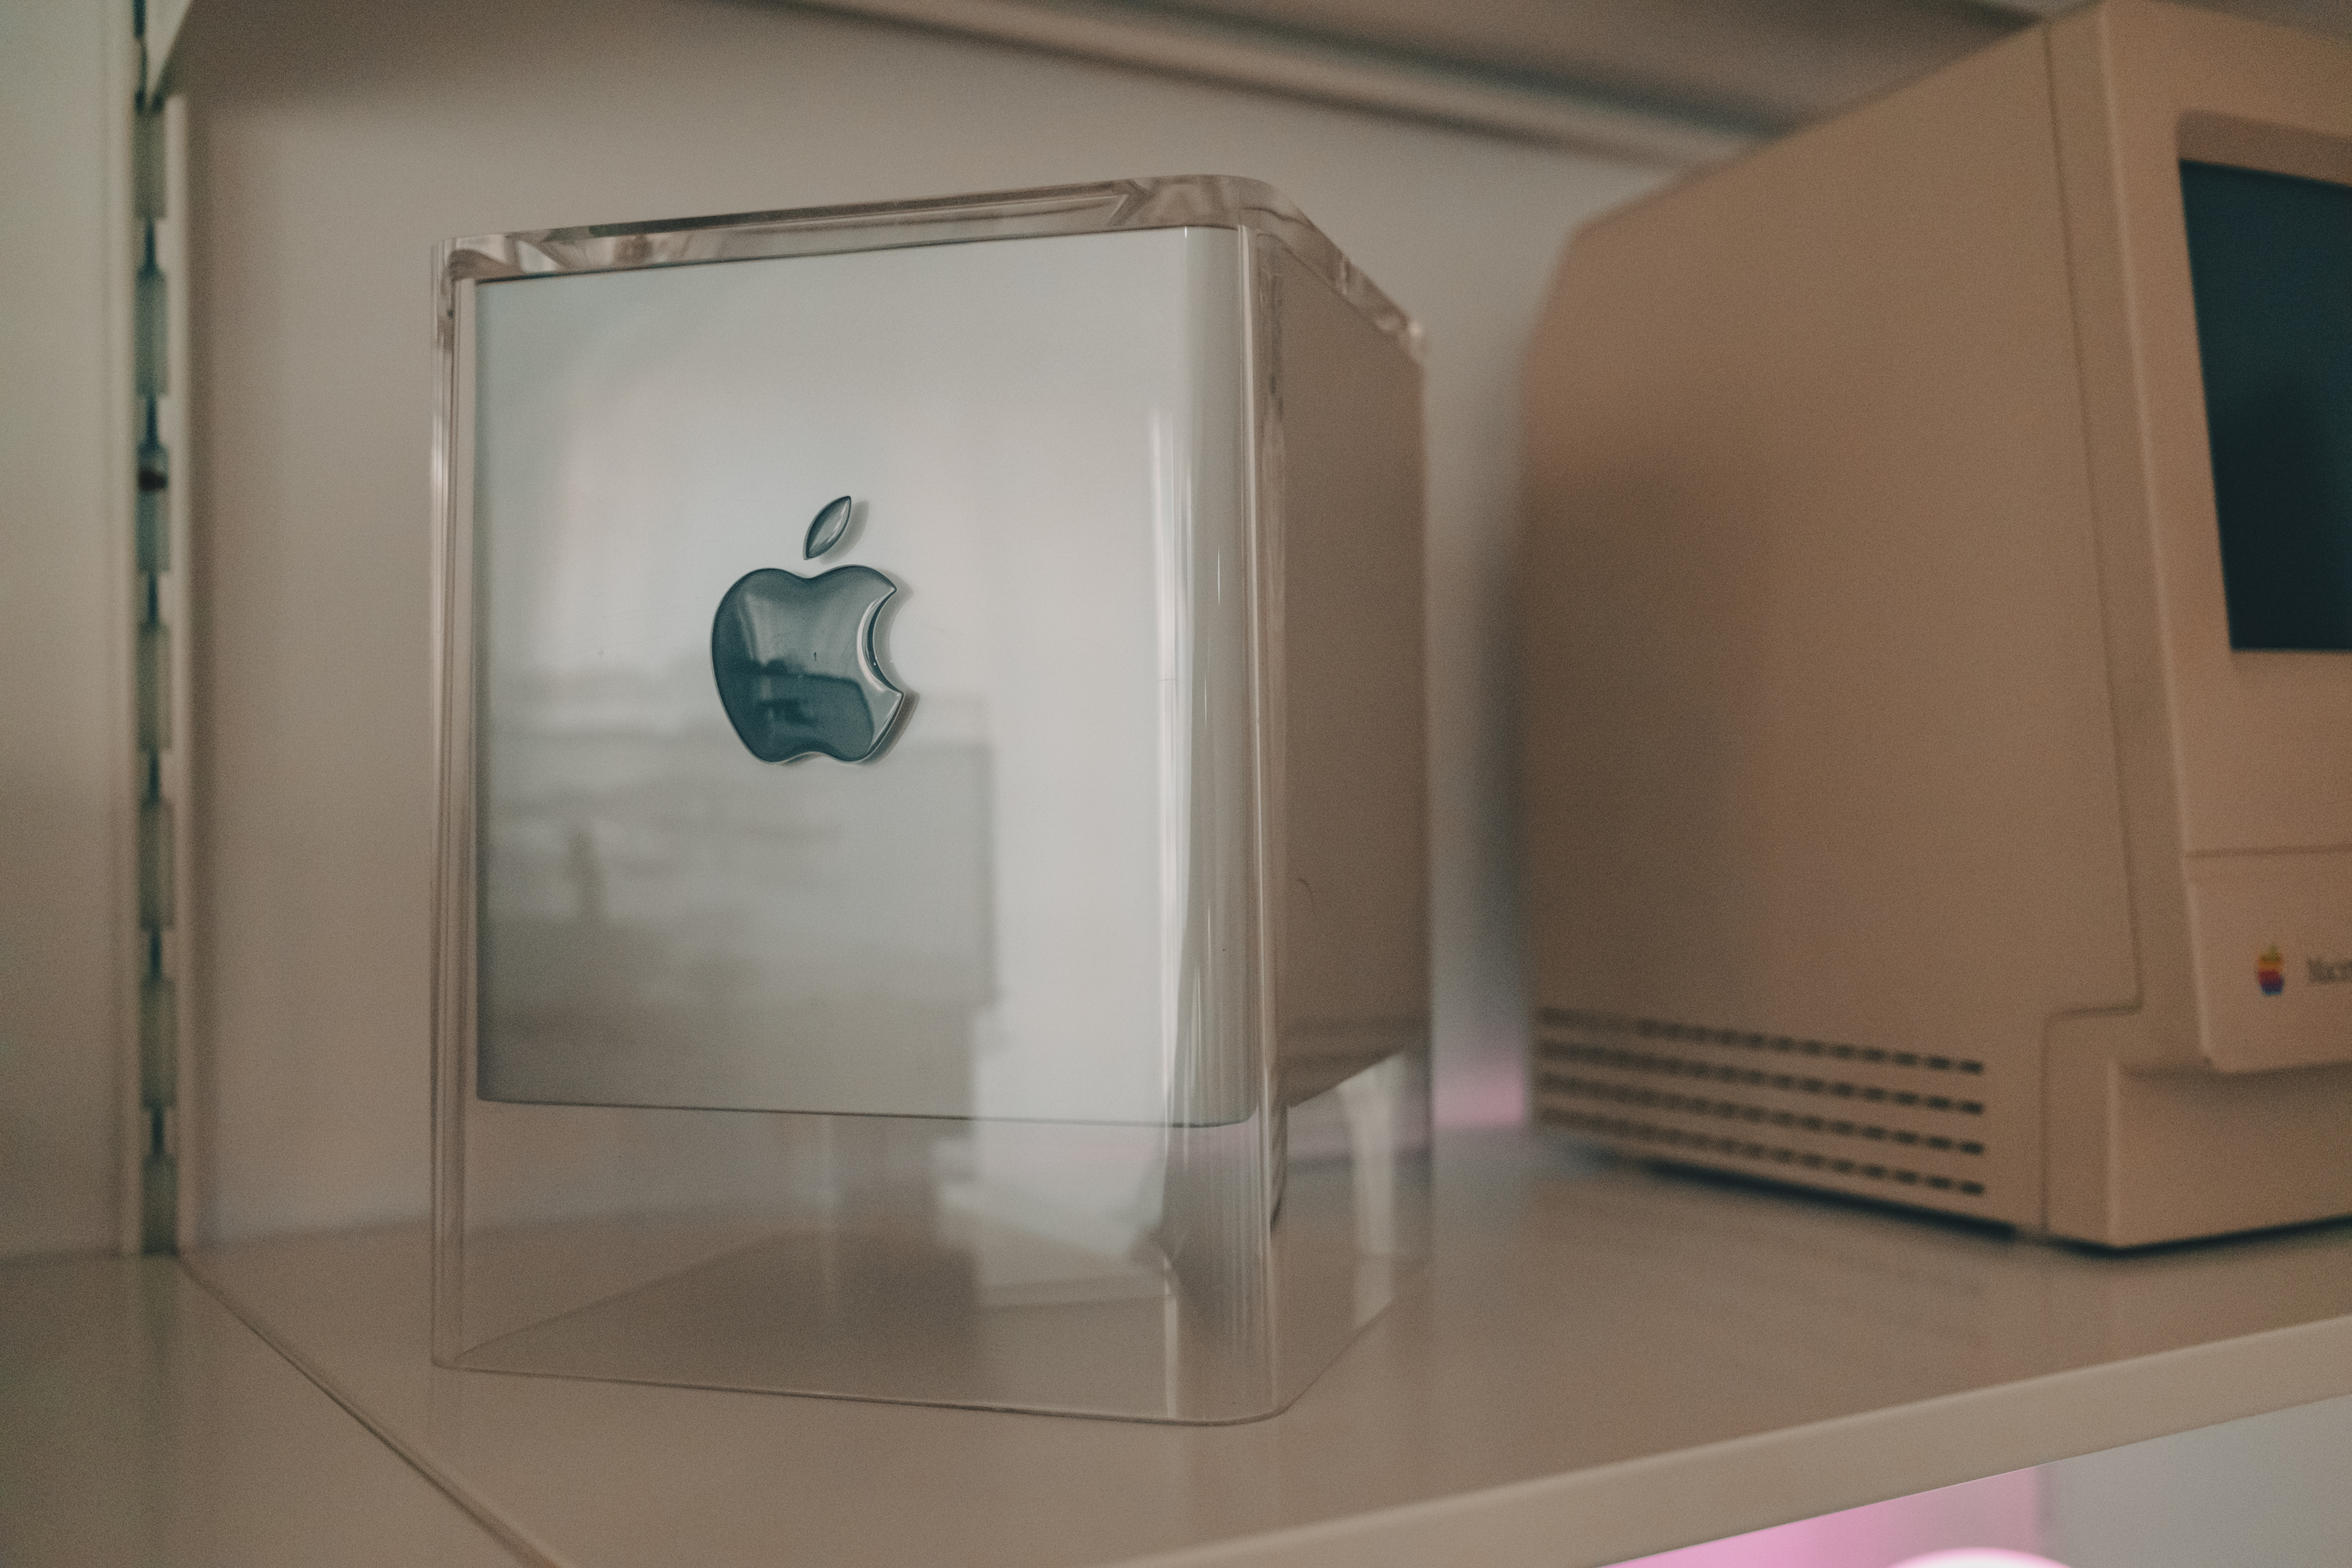
On my desk sat a 2013 Mac Pro. The infamous “trash can” - and to understand why it matters, you need to know Apple’s complicated relationship with professional desktop computing.
In 2000, Steve Jobs unveiled the Power Mac G4 Cube. A stunning 8-inch suspended cube of polycarbonate and aluminum, fanless, beautiful enough for MoMA’s permanent collection. It was a commercial disaster. Too expensive, too limited, too much form over function. Apple discontinued it after just one year.
The Cube became a cautionary tale: Apple could make gorgeous machines, but professionals needed power more than aesthetics.
Fast forward to 2013. Apple had dominated laptops but was losing the professional desktop market. Their answer was the Mac Pro 6,1 - another bold design statement. A black cylinder barely larger than a coffee pot, with a glowing thermal core at its center. Jony Ive’s team had created perhaps the most beautiful computer ever made.
The attention to detail was extraordinary. Pick it up and rotate it, and a motion sensor illuminates the ports on the back - a small flashlight built into the machine so you can plug cables in the dark. The entire outer shell lifts off with a single latch, revealing the triangular thermal core like opening a jewelry box. Even the power cord has a custom design. This wasn’t just a computer; it was an object.
And once again, it failed.
The design trapped everything inside a thermal envelope that couldn’t be upgraded. Professionals who needed expandable GPU power watched as the rest of the industry moved to massive multi-GPU workstations while their €3,000+ Mac Pro sat frozen in 2013. Apple essentially abandoned it - no updates for six years.
In 2017, in an unprecedented move, Apple executives invited journalists to a private briefing specifically to apologize. They admitted the thermal design was a dead end, promised a modular replacement, and asked professionals to wait. It took two more years. The 2019 Mac Pro finally delivered what pros needed - at €6,000 starting price. The trash can became a footnote, a cautionary tale taught in design schools: beauty without utility is just sculpture.
Here’s the irony: the very thing that made it fail as a workstation makes it perfect as a home server. It’s whisper-quiet. It’s compact. It’s gorgeous. And I don’t need to upgrade the GPUs - I just need it to run Linux containers.
Today, Apple Silicon has achieved what seemed impossible: workstation-class performance at laptop power consumption. A Mac Studio draws 40W and outperforms machines that draw 300W. If Apple wanted to make a modern “Cube” - a compact, beautiful desktop for professionals - they finally have the technology to do it right.
They won’t. The market has moved on. Everyone wants laptops. The days of iconic desktop designs are probably over.
But my trash can still hums quietly in the corner. A beautiful failure, finally doing something useful.
The Hardware Reality
Let’s be honest about the economics. If I wanted the most practical homelab, I’d buy an Intel N100 mini PC for €150. It consumes 10W, runs cool, works perfectly for light workloads. The Mac Pro pulls 80-100W just existing.
But I don’t optimize purely for efficiency. I optimize for learning, for craft, for keeping hardware out of landfills.
The specs still hold up:
- CPU: Intel Xeon E5-1650v2 - 6 cores, 12 threads at 3.5GHz
- RAM: 64GB DDR3-1866 ECC
- Graphics: Dual AMD FirePro D500 (3GB each)
- Storage: 256GB internal SSD (Proxmox boot drive)
- Connectivity: 6x Thunderbolt 2, 4x USB 3.0, 2x Gigabit Ethernet
It’s Intel-based, which means Linux runs natively. I used rEFIt to boot from USB, Proxmox installed without issues, and suddenly I had a whisper-quiet server with workstation-grade specs.

Before you buy new hardware, look at what you already own. The sunk cost is already paid - the marginal cost of experimenting is zero.
The USB Disaster
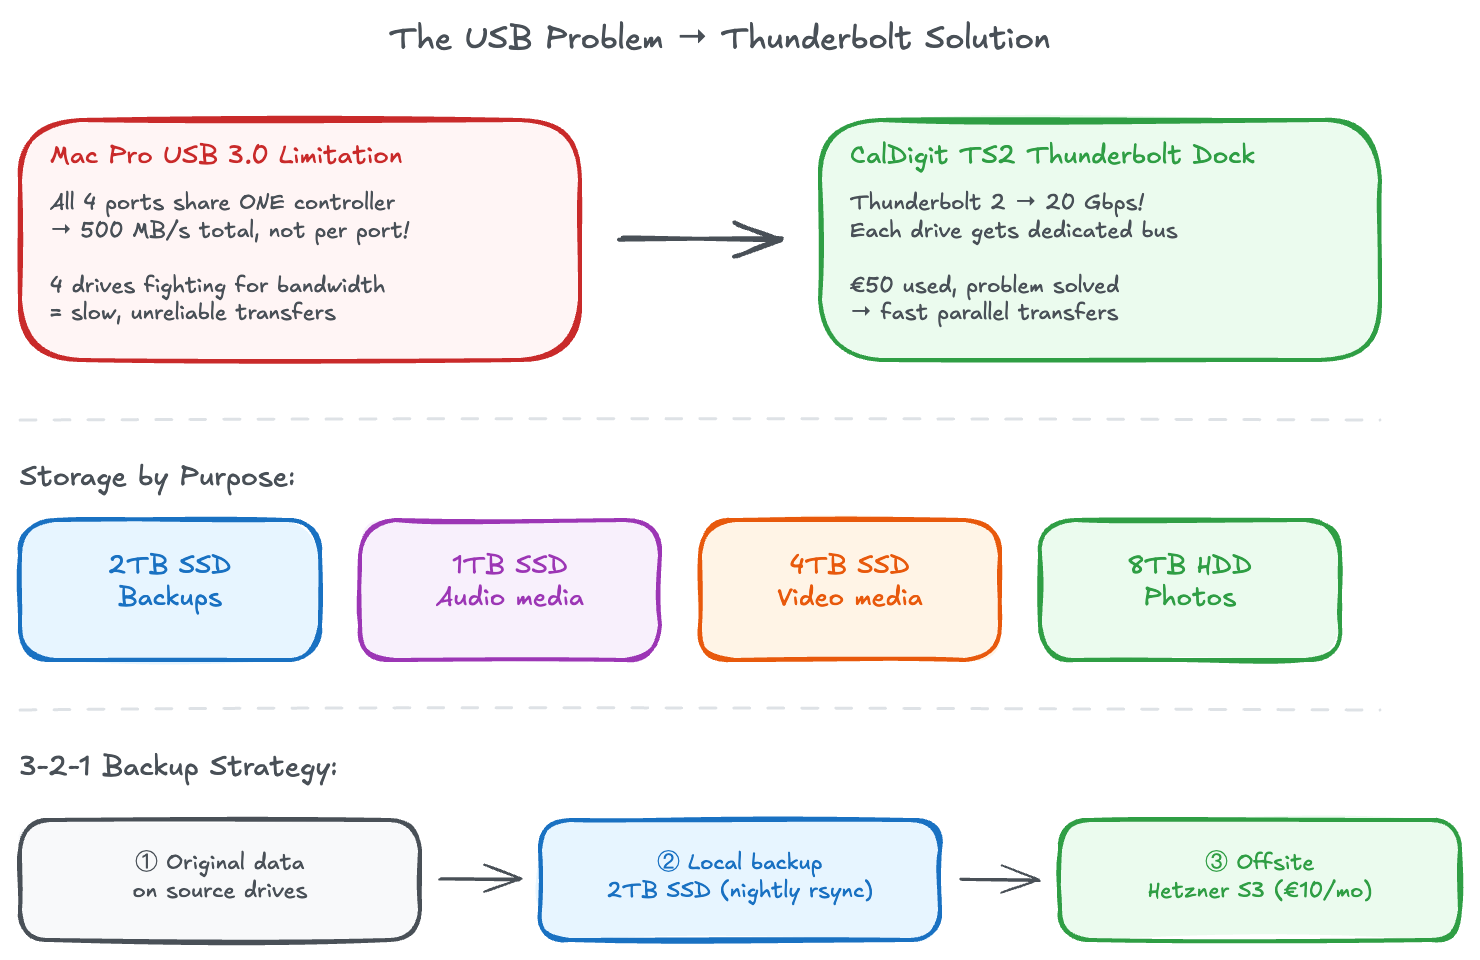
The Mac Pro has four USB 3.0 ports. I assumed I could just plug in my external drives and be done with it. I was wrong.
I connected a 2TB SSD for backups, plus several larger drives for media and photos. Everything seemed fine until I tried to sync my iPhone’s photo library to Immich - 77,000 photos, about 650GB.
The import started. CPU usage spiked as the machine learning models processed faces and objects. Disk I/O hit sustained 400MB/s writes. And then: kernel panic. System completely unresponsive. After a hard reboot, the filesystem was in emergency read-only mode.
I spent hours debugging. RAM tests, kernel logs, filesystem checks. Eventually I found the culprit: all four USB 3.0 ports on the Mac Pro 6,1 share a single PCIe 2.0 x1 lane. That’s 500 MB/s total bandwidth, shared across all ports.
The math didn’t work. iPhone sync pushing 200 MB/s, database writes at 50 MB/s, thumbnail generation at 100 MB/s, ML processing reading and writing constantly - total I/O exceeded what the USB controller could handle. The kernel protected itself by remounting everything read-only.
The CalDigit Solution
The fix: a CalDigit Thunderbolt Station 2 from eBay UK for €80. This dock connects via Thunderbolt 2 (20Gbps - 40x more bandwidth than the USB controller) and has its own independent USB 3.0 controller.
All storage now goes through the CalDigit. The Mac Pro’s built-in USB ports sit unused. No more crashes, no more read-only emergencies. The bottleneck is completely bypassed.
Legacy hardware has legacy limitations. The Thunderbolt ports on this machine are still genuinely fast - they just needed the right peripheral to unlock that potential.
Enter Claude Code: AI-Assisted Systems Administration
Here’s where this story takes an unexpected turn.
I installed Claude Code directly on the Proxmox host. Not to write application code - to help me administer the system.
Think about what sysadmin work actually involves: reading man pages, grepping through logs, writing bash one-liners, debugging configuration files, researching obscure error messages. It’s all text manipulation. It’s exactly what LLMs excel at.
When I hit the USB kernel panic, I didn’t spend hours on Stack Overflow piecing together fragments from outdated forum posts. I described the symptoms to Claude. It asked clarifying questions about the hardware. It suggested checking dmesg for USB controller errors. It explained the PCIe lane limitation before I’d even found the relevant kernel documentation. Four hours of frustration compressed into fifteen minutes of dialogue.
When I needed Samba shares with different permission levels - some read-only, some read-write, some guest-accessible - I described what I wanted in plain English. Claude generated the smb.conf with inline comments explaining each directive. I reviewed it, understood the logic, tweaked one path, applied it. Working configuration in ten minutes instead of two hours of trial and error.
The Tailscale subnet router configuration. The Nginx Proxy Manager SSL setup with Cloudflare DNS challenge. The LXC container resource limits. For each of these, I used Claude as a pair sysadmin. Not blindly copying commands - reviewing, understanding, learning - but at dramatically accelerated pace.
This is what the industry is missing. Everyone talks about AI for writing code. Almost nobody talks about AI for operations. But infrastructure work - Linux administration, networking, security configuration - is equally suitable for AI assistance. Perhaps more so, because documentation is scattered across decades of man pages, tribal knowledge dominates, and the difference between “works” and “doesn’t work” is often a single misplaced character.
I know some people are skeptical - or outright hostile - toward using AI for technical work. “If you used AI, you didn’t really learn anything.” I understand the instinct, but I think it misses the point.
Working with Claude Code is like pair programming with a senior colleague who’s always available. Sometimes it’s frustrating - the AI makes mistakes, misunderstands context, needs correction. But that’s true of any collaboration. The difference is that this colleague has read every man page, remembers every obscure flag, and can explain the why behind each configuration choice.
And isn’t this exactly what we built computers for? To amplify our capabilities, to handle the tedious parts so we can focus on the interesting ones? Every generation of tools faces the same criticism: calculators will make people forget math, IDEs will make people forget syntax, Stack Overflow will make people stop thinking. Yet here we are, building more complex systems than ever before.
I reviewed every command Claude suggested. I understood every configuration file. I learned every concept - but in hours instead of days. The knowledge is mine. The AI just made the transfer more efficient.
If you’re not using AI tools for sysadmin work, you’re leaving time on the table. The same prompting skills that work for code work for infrastructure. The time savings compound dramatically.
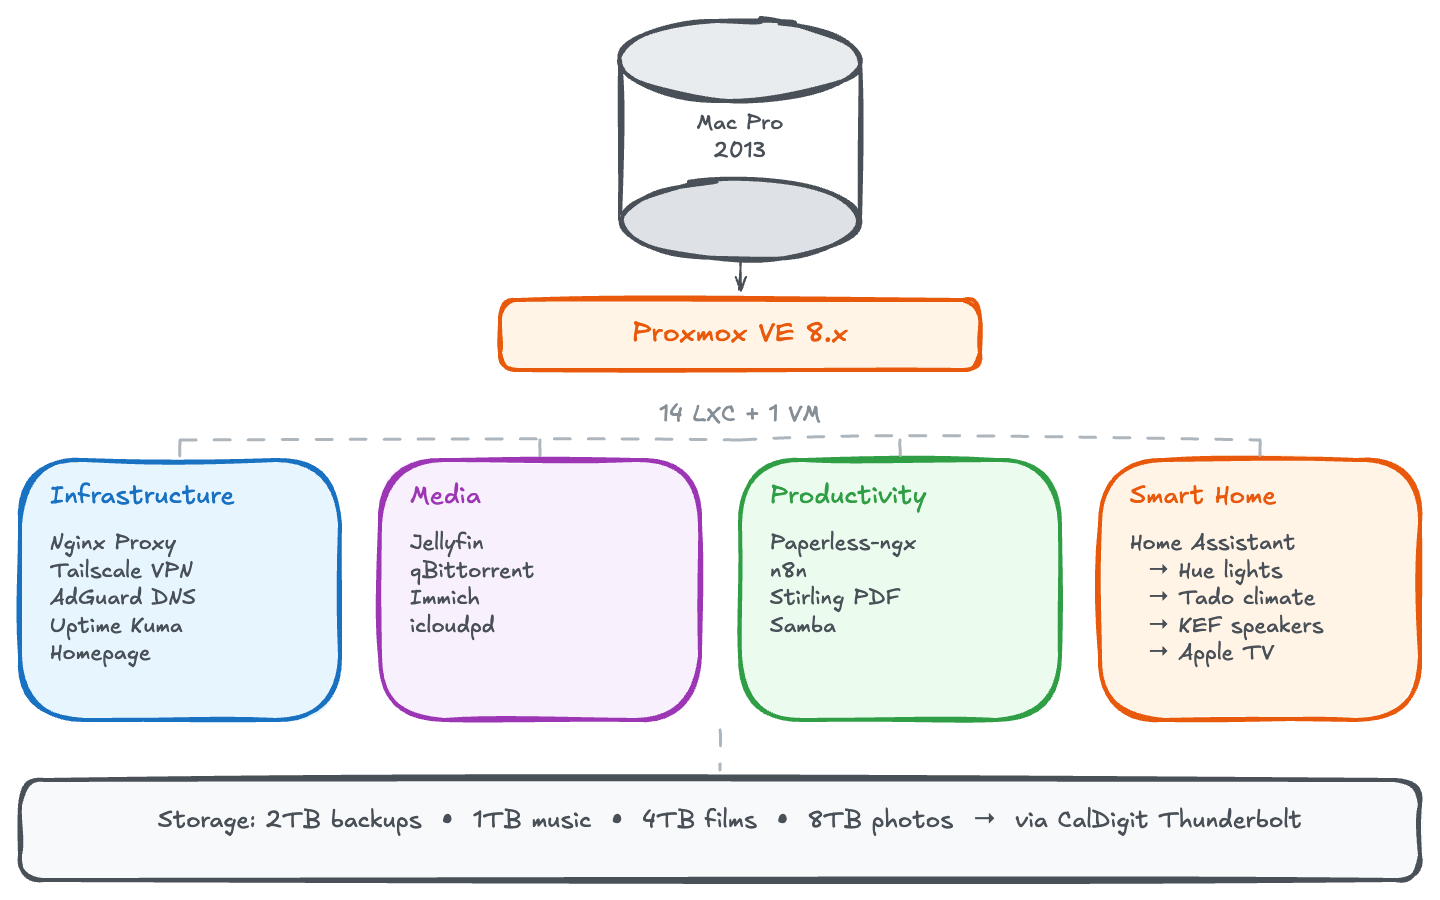
The Architecture
I run Proxmox VE as the hypervisor. Open source, free, rock solid. Each service gets its own LXC container - lightweight Linux containers with near-native performance, proper init systems, and easy snapshot backups.
The Proxmox Community Scripts
Here’s something that saved me countless hours: the Proxmox VE Helper Scripts.
This project started as the work of one person - a hobbyist known as “tteck” who created an incredible collection of one-liner scripts to deploy LXC containers for virtually any self-hosted service. Want Jellyfin? One command. Paperless-ngx? One command. Each script handles the container creation, package installation, and initial configuration automatically.
Tragically, tteck passed away in late 2024. But the community picked up the project, maintaining his vision while continuing to expand it. It’s a beautiful example of open source at its best - one person’s passion project becoming a community resource that outlives its creator.
For anyone starting with Proxmox, these scripts are invaluable. They encode best practices, handle edge cases, and let you focus on configuration rather than installation. Claude Code helped me understand what each script was doing, but the scripts themselves did the heavy lifting.
Currently running 14 containers plus one VM:
Infrastructure Layer:
- Nginx Proxy Manager - reverse proxy with automatic Let’s Encrypt SSL
- Tailscale - subnet router for remote access from anywhere
- AdGuard Home - DNS server with ad blocking
- Uptime Kuma - monitoring and alerts
- Homepage - dashboard showing everything at a glance
- Glances - real-time system monitoring (CPU, RAM, disk, temperatures)
Media & Entertainment:
- Jellyfin - open source media server
- qBittorrent - download management
Productivity:
- Paperless-ngx - document OCR and management
- Immich - photo management replacing iCloud
- n8n - workflow automation
- Stirling PDF - PDF manipulation (merge, split, compress, OCR)
Storage:
- Samba - network file shares for all devices
Home Automation:
- Home Assistant (VM) - controls lights, heating, speakers - runs as a full VM rather than LXC because it needs direct hardware access for USB dongles and Bluetooth, plus the official Home Assistant OS includes a supervisor that manages add-ons and updates automatically
Utilities:
- MySpeed - network speed testing and historical tracking
Four drives connected through the CalDigit dock: a 2TB SSD for backups (container snapshots, configs, Paperless exports), and larger drives for media libraries and photos.
LXC containers are underrated. If you’re running services that don’t need Docker’s portability guarantees, LXC is simpler, more performant, and integrates better with traditional Linux administration patterns.
Remote Access: Tailscale + Real Domains
This is where the setup stops feeling like a hobby project and starts feeling like professional infrastructure.
A single container runs Tailscale as a subnet router, advertising my entire home network to my Tailscale account. Any device with Tailscale installed - MacBook, iPhone, iPad, even Apple TV - can reach any internal IP as if it were sitting on my home network. From a coffee shop in Paris or an airport in Tokyo.
But the real elegance is in combining this with proper domains and wildcard SSL.
My domain is managed through Cloudflare. One wildcard DNS record points *.home.mydomain.com to Nginx Proxy Manager. NPM handles routing and SSL using Let’s Encrypt with DNS challenge - one wildcard certificate covers all subdomains and auto-renews every 90 days.
The transformation is dramatic:
| Before | After |
|---|---|
192.168.1.45:8096 |
jellyfin.home.mydomain.com |
192.168.1.52:2283 |
immich.home.mydomain.com |
192.168.1.60:8123 |
ha.home.mydomain.com |
Every service gets a proper subdomain. No more bookmarking IP addresses. No more remembering port numbers. Just clean URLs that work everywhere - home or away, same experience, same green padlock.
At home: The URL resolves locally to NPM, routes to the service. Instant access.
Away from home: Same URL. Tailscale routes traffic through the encrypted WireGuard tunnel. Identical experience.
No ports exposed to the internet. Zero port forwards on my router. The only way in is through Tailscale’s encrypted mesh.

The combination of Tailscale + Cloudflare DNS + wildcard SSL certificates transforms a home setup into something that feels enterprise-grade. The total setup time was maybe 30 minutes with Claude’s help. The security posture is better than most VPN configurations I’ve seen at actual companies.
Network Storage: The Samba Hub
One container exposes all storage to the network via Samba. Clean, simple, universally accessible.
The setup is straightforward: mount all external drives to the Samba container using Proxmox’s LXC mount points, then define shares in smb.conf. Each share can have different permissions - some read-only for media that shouldn’t be modified, others read-write for active work folders. I use a single authenticated user for personal access and a guest share for media devices that don’t support authentication well.
Setting Up LXC Mount Points
In Proxmox, you add mount points to your container configuration. Edit /etc/pve/lxc/<container-id>.conf and add lines like:
mp0: /mnt/storage/media,mp=/mnt/media
mp1: /mnt/storage/documents,mp=/mnt/documents
mp2: /mnt/storage/backups,mp=/mnt/backups
The first path is the location on the Proxmox host, the second is where it appears inside the container. The container sees these as local directories - no NFS, no iSCSI, no complexity.
Samba Configuration
The smb.conf file defines your shares. Here’s the structure I use:
[global]
workgroup = WORKGROUP
server string = Home Server
security = user
map to guest = Bad User

[media]
path = /mnt/media
browseable = yes
read only = yes
guest ok = yes

[documents]
path = /mnt/documents
browseable = yes
read only = no
valid users = stefano
create mask = 0644
directory mask = 0755

[paperless-inbox]
path = /mnt/documents/inbox
browseable = yes
read only = no
valid users = stefano
The key decisions:
- Media shares are read-only and guest-accessible - devices like Apple TV and smart speakers can access them without authentication hassles.
- Document shares require authentication - anything sensitive needs a username and password.
- Paperless inbox is a special folder - anything dropped here gets automatically consumed by Paperless-ngx for OCR processing.
Connecting Other Services
Other containers that need storage access get their own mount points. Jellyfin mounts /mnt/media read-only. Paperless mounts /mnt/documents/inbox read-write to consume files and /mnt/documents/archive to store processed documents. Each service sees only what it needs.
This separation matters for security: if Jellyfin gets compromised, it can’t touch your documents. If a container goes rogue, the damage is contained.
From any Mac on the network: Cmd+K, connect to the server, and browse everything. The same shares work from iPhone and iPad - the Files app speaks SMB natively.
I scan a receipt, save to the Paperless inbox, and it appears in my searchable document archive minutes later. No manual filing, no folder hunting, no forgetting where I put things.
Don’t overthink storage access. One Samba container that mounts all drives is simpler than trying to give each service its own storage access. Centralize, standardize, simplify.
Media: Jellyfin + Infuse + KEF Speakers
Jellyfin handles all media. Open source, no subscriptions, no cloud dependencies. It indexes my media libraries - fetches metadata automatically, tracks watch history.
On Apple TV I use both Swiftfin (the native Jellyfin client) and Infuse (premium player with superior codec support). Infuse’s killer feature: it connects to both Jellyfin and the Samba share simultaneously. At home it streams directly from Samba - zero transcoding, instant playback of 4K HDR. Away from home via Tailscale, it falls back to Jellyfin streaming.
The workflow is simple: qBittorrent downloads to a staging folder, organized by category. When complete, files move automatically to the right library folder. Jellyfin scans periodically. By the time I sit down to watch, everything is indexed with poster, description, and cast information - no manual intervention.
Jellyfin’s built-in DLNA server also connects directly to my KEF LSX II LT speakers. FLAC files stream without transcoding to speakers that can actually reproduce the quality. The KEF Connect app discovers Jellyfin automatically - I just select it as the source.

Don’t try to find one solution that does everything. Layer complementary tools. Jellyfin for metadata and streaming, Samba for direct access, DLNA for speakers. Each does one thing well.
Photos: Why I Duplicated My iCloud Library
I had 80,000 photos and videos in iCloud. 800GB of memories, and growing every month. Paying Apple €10/month for the privilege of having my data locked in their ecosystem.
Immich is a self-hosted alternative that genuinely rivals Google Photos. Mobile apps with background sync. Machine learning for face detection, object recognition, scene classification. I can search “pizza in Rome” and find exactly those photos.
Exporting from iCloud was brutal. I used icloudpd running overnight for several days - this was before I’d solved the USB bandwidth issues, so crashes and restarts were constant. But eventually all 80,000 photos made it out, got processed by Immich’s ML models, and became searchable.
My iPhone still backs up to iCloud - I’m keeping that subscription. But now it also backs up to Immich via the mobile app. This isn’t about saving €10/month. It’s about insurance.
Accounts get locked. Services shut down. Companies make policy changes. These aren’t hypotheticals - I’ve watched friends lose access to their Google accounts and everything inside them. And there are photos of my daughter in that library that I absolutely cannot lose.
Having them on hardware I control, in my apartment, under my roof, gives me something no cloud subscription can: certainty.
Cloud backups and local backups aren’t mutually exclusive. The real safety comes from having both. Keep your subscriptions - but also keep your own copies.
Backups: The 3-2-1 Rule
All of this would be pointless without disaster recovery. A hardware failure, a fire, a burglary - any of these could wipe out everything.
I follow the 3-2-1 backup rule: three copies of data, on two different media types, with one copy off-site.
Local copies: Proxmox’s built-in backup system snapshots all containers and VMs weekly. These live on a separate drive from the one running the services. If a container gets corrupted, I can restore in minutes.
Off-site copy: The irreplaceable stuff - photos and documents - syncs nightly to Hetzner Object Storage. It’s S3-compatible, hosted in Germany (EU data residency), and costs about €10/month for my data. A simple rclone cron job handles the sync.
If my apartment floods tomorrow, I lose hardware but not memories. The photos of my daughter’s first steps, the contracts for my business, the documents I’d rather not lose - all of it exists in a data center 600km away.
And honestly? For my use case, sophisticated backup schemes start feeling like exercises in style over substance. What do I actually care about losing? Photos and videos of my family. Everything else can be rebuilt. Those photos exist in three places: iCloud (Apple’s problem), the server (my problem), and Hetzner (Germany’s problem). That’s genuine redundancy, not RAID theater.
This was always an experiment - seeing how far I could push recycled hardware before buying anything new. Turns out: pretty far.
Automation that saves itself: When I was downloading 800GB from iCloud, the USB controller issues meant the system would crash every 6-8 hours. Instead of babysitting the process, I wrote a watchdog script that runs every 5 minutes, checks if the download process is alive, and restarts it automatically if it’s dead or stuck. The download took three days, but I only had to start it once. This is the kind of infrastructure thinking that transfers directly to production systems.
Off-site backup is non-negotiable. Local redundancy protects against hardware failure. Off-site protects against everything else.
Documents: Paperless-ngx
Every piece of paper that enters my house gets scanned and shredded. Paperless-ngx OCRs everything in three languages - English, Italian, French - making full text searchable. Living in Brussels means dealing with documents in all three: French for local administration, Italian for family matters back home, English for work and international services. Paperless handles this seamlessly, auto-detecting the language and extracting text accurately.
The killer feature: I have two Samba folders on my Mac - one for personal documents, one for business. I drag a PDF into the appropriate folder, and Paperless consumes it automatically. Based on which folder it came from, it gets tagged as personal or business. The original file disappears from Samba (consumed), and the document appears in Paperless, fully indexed and searchable.
Need a utility bill from 2023? Search, click, done. Tax season is no longer a nightmare of hunting through folders.
The best automation is invisible. Once configured, Paperless just works. Documents appear, get processed, become searchable. Zero ongoing effort.
Home Automation: Bringing It Together
Home Assistant runs in a VM - it needs more isolation than LXC provides - and it’s become the central nervous system of the apartment.
The dashboard shows everything at a glance: lights organized by room (camera, cucina, soggiorno, studio), climate sensors, energy monitoring, and media controls. Here’s what’s actually connected:
Lighting: A mix of smart switches and bulbs across all rooms. Nothing fancy - just the ability to control everything from one place, set schedules, and create scenes.
Fritz!Box integration: My router and repeater report their status directly to Home Assistant. I can see network health without opening another app.
KEF LSX II: Full control over the speakers - power, volume, source selection. The dashboard shows what’s currently playing (right now: John Coltrane’s Giant Steps, because some things never get old).
Govee LED strips: Ambient lighting that can sync with the rest of the home automation.
Climate monitoring: Temperature and humidity sensors in multiple rooms, plus a smart humidifier with percentage control.
Energy monitoring: Smart plugs on key devices (the server rack, entertainment center) track power consumption. I can see exactly how much the Mac Pro is costing me.
Apple TV integration: Control playback, see what’s playing, include it in automations.
Broadlink RM4 mini: IR blaster for controlling devices that aren’t smart - the Philips TV, older equipment.
The dashboard works identically from the couch or another continent, thanks to Tailscale.
Home automation works best when invisible. The goal isn’t a flashy dashboard - it’s lights that just work, heating that adapts, music that plays without friction. Automate the predictable, leave manual control for the exceptional.
The Compound Effect
Here’s what I’ve realized after this project, and it’s the insight I most want to share:
Technical skills compound.
Every hour I spend in the terminal, every service I debug, every configuration file I understand - it all accumulates. The knowledge from setting up Tailscale informs how I think about network security at work. The experience debugging kernel panics makes me better at understanding our infrastructure team’s challenges. The patterns I learn here show up in production conversations.
Claude Code accelerated everything by maybe 3x. What would have been a month of evening sessions became a week. But the understanding is mine. I reviewed every command, understood every configuration, learned every concept. The AI didn’t do the learning for me - it eliminated the tedious parts so I could focus on the interesting ones.
The Proxmox community scripts did something similar - they automated the repetitive installation steps so I could focus on configuration and integration. Between these tools, I went from “I should set up a homelab someday” to “everything is running” in about a week of evenings.
This homelab is my laboratory. A place where I can break things without consequences, experiment with new tools, stay current with infrastructure patterns. The cost is some evening hours and roughly €150/year in electricity. The return is knowledge that transfers to every technical conversation I have.
What’s Next
A homelab is never “done.” That’s part of the appeal. Here’s what’s on my roadmap:
- UPS (Uninterruptible Power Supply) - Belgium has occasional power flickers. A UPS would give the server time to shut down gracefully and protect against filesystem corruption.
- Vaultwarden - Self-hosted Bitwarden-compatible password manager. I trust LastPass, but having my own instance as backup aligns with the redundancy philosophy.
- Grafana + Prometheus - Proper monitoring dashboards with historical data. Glances is great for real-time, but I want to see trends over weeks and months.
The beauty of self-hosting is that each improvement builds on the last. The skills compound. The infrastructure matures. And there’s always something new to learn.
Final Thoughts
The Mac Pro hums quietly in the corner. Its soft LED glows in the dark. A beautiful machine, built for creative professionals, now serving as infrastructure for my digital life.
Is it the optimal choice? No. A mini PC would be more efficient. Cloud services would be easier. But optimization isn’t always the goal.
Sometimes the goal is learning. Sometimes it’s sovereignty - knowing that the photos of my daughter exist on hardware I control, not just in someone else’s cloud. Sometimes it’s the satisfaction of looking at a machine you configured, running software you understand, serving data you own.
For me, this project was all three.
If you’re someone with too little time and too much curiosity - and you’ve been putting off that homelab project because “when would I ever have time?” - start small. One container. One service. One evening. The Proxmox scripts make it almost too easy.
The industry moves fast. The only way to keep up is to keep building.
Running Costs
People always ask what this costs to run. Here’s the honest breakdown:
Monthly recurring:
| Item | Cost |
|---|---|
| Electricity (~100W × 24/7) | ~€27/month |
| Hetzner Object Storage | ~€10/month |
| Domain renewal (amortized) | ~€1/month |
| Tailscale | Free tier |
| Cloudflare | Free tier |
| Total monthly | ~€38/month |
One-time costs:
| Item | Cost |
|---|---|
| Mac Pro 6,1 | Already owned |
| CalDigit TS2 (eBay) | €80 |
| WD Red Pro 8TB (Black Friday) | €150 |
| Other drives | Already owned |
| Total hardware purchased | ~€230 |
Is it cheaper than cloud services? Probably not, if you account for my time. But that’s missing the point. I didn’t do this to save money - I did it to learn, to own my data, and to have a laboratory for experimenting. The education alone is worth more than the cost.
And unlike a cloud subscription, the hardware doesn’t disappear if I stop paying.
Key Takeaways
-
Legacy hardware has hidden value. Before buying new, look at what you already own. The Mac Pro’s Thunderbolt ports unlocked performance I never expected.
-
AI tools work for sysadmin, not just coding. Claude Code cut my setup time dramatically. Most people are overlooking AI for infrastructure work.
-
Real domains transform home setups. Wildcard SSL + DNS + Tailscale gives you enterprise-grade remote access in an afternoon.
-
LXC containers beat Docker for homelabs. Simpler, more performant, better integrated with traditional Linux patterns.
-
Cloud and local backups complement each other. Keep your subscriptions - but also keep your own copies. Accounts get locked, services shut down. Redundancy is peace of mind.
-
Technical skills compound. Every hour in the terminal pays dividends. The knowledge transfers to every technical conversation you have.
-
Beautiful hardware deserves a second life. The Mac Pro failed as a workstation but succeeds as a server. Sometimes a product’s best use isn’t what it was designed for.
The Setup At a Glance
- Hardware: Mac Pro 6,1 (2013)
- Hypervisor: Proxmox VE
- Containers: 14 LXC containers, 1 VM
- Storage: 15TB across 4 drives
- Services: Jellyfin, Immich, Paperless-ngx, Home Assistant, AdGuard Home, n8n, and more
- Power consumption: ~100W
- Setup time: One week of evenings with Claude Code (without: probably three weeks)
Resources & Links
Virtualization & Containers:
- Proxmox VE - Open source hypervisor
- Proxmox VE Helper Scripts - One-liner container deployments
- tteck’s Legacy Discussion - The story behind the scripts
Self-Hosted Services:
- Jellyfin - Open source media server
- Immich - Self-hosted photo management
- Paperless-ngx - Document OCR and management
- Home Assistant - Home automation platform
- n8n - Workflow automation
- AdGuard Home - DNS ad blocking
- Uptime Kuma - Self-hosted monitoring
- Stirling PDF - PDF manipulation tools
- Glances - Real-time system monitoring
Networking & Remote Access:
- Tailscale - Zero-config mesh VPN
- Nginx Proxy Manager - Reverse proxy with SSL
- Cloudflare - DNS and CDN
Media Players:
Tools:
- Claude Code - AI-assisted development and sysadmin
- icloudpd - iCloud photo downloader
- rEFIt / rEFInd - Boot manager for Mac
- rclone - Command-line cloud sync tool
Hardware:
- CalDigit Thunderbolt Station 2 - Thunderbolt dock (discontinued, available used)
Backup & Storage:
- Hetzner Object Storage - S3-compatible storage in EU